I created a starter template for developing browser extensions by combining WXT and Angular. You can efficiently develop extensions for multiple browsers including Chrome and Firefox using Angular’s latest features.
What is WXT
WXT is a framework that streamlines browser extension development. Built on Vite, it provides a comfortable development experience with fast HMR (Hot Module Replacement) and a file-based manifest auto-generation system.
Particularly useful is its ability to generate extensions for multiple browsers including Chrome, Firefox, Edge, and Safari from a single codebase. It supports both Manifest V2 and V3, absorbing browser-specific differences.
Building Browser Extensions with Angular
For the UI part of browser extensions, you’ll be loading HTML. WXT officially supports several libraries. When you run the wxt init command, you can choose templates like Vanilla, React, or Vue, but there’s no Angular template yet. However, the setup isn’t too difficult - you can simply configure Angular on top of the Vanilla base.
Note that to run Angular with Vite, you need the @analogjs/vite-plugin-angular plugin. This plugin is provided by the AnalogJS project and enables Angular to work within the Vite ecosystem.
Project Structure
The starter template has the following structure:
├── entrypoints/
│   ├── popup/          # Angular popup interface
│   │   ├── index.html
│   │   ├── main.ts     # Angular bootstrap
│   │   ├── app.ts      # Root component
│   │   └── style.css   # Tailwind CSS
│   ├── background.ts   # Background script
│   └── content.ts      # Content script
├── wxt.config.ts       # WXT configuration
├── tsconfig.json       # Base TypeScript config
└── [tsconfig.app](http://tsconfig.app/).json   # Angular-specific config
In WXT, manifests are automatically generated from files in the entrypoints directory. The popup directory serves as the entry point for the Angular application, while background.ts and content.ts can be written in plain TypeScript.
Setup Steps
Here are the steps to build from scratch.
1. Initialize WXT Project
First, create a WXT project:
pnpm dlx wxt@latest init my-extension
cd my-extension
2. Install Dependencies
Install Angular core and build tools:
# Angular core
pnpm add @angular/core @angular/common @angular/compiler @angular/platform-browser rxjs

# Build tools
pnpm add -D @analogjs/vite-plugin-angular @angular/build @angular/compiler-cli

# Tailwind CSS (optional)
pnpm add -D tailwindcss @tailwindcss/vite
3. Pin Vite Version
Since @analogjs/vite-plugin-angular requires Vite 7.x, pin the version in package.json:
{
  "pnpm": {
    "overrides": {
      "vite": "^7.3.0"
    }
  }
}
After adding this, run pnpm install to apply the version.
4. Configure WXT
Configure Vite plugins in wxt.config.ts:
import { defineConfig } from 'wxt';
import angular from '@analogjs/vite-plugin-angular';
import tailwindcss from '@tailwindcss/vite';

export default defineConfig({
  vite: () => ({
    resolve: {
      mainFields: ['module'], // Prioritize ESM
    },
    plugins: [
      angular({
        tsconfig: '[tsconfig.app](http://tsconfig.app/).json',
        // Limit Angular compilation to specific entrypoints
        transformFilter: (_code: string, id: string) => {
          return id.includes('/entrypoints/popup/');
        },
      }),
      tailwindcss(),
    ],
  }),
});
The key is the transformFilter configuration. This ensures that only files in the entrypoints/popup/ directory are processed by the Angular compiler. Background and content scripts are treated as plain TypeScript, allowing coexistence of code that doesn’t use Angular.
5. Configure TypeScript
Separate project-wide configuration from Angular-specific configuration.
tsconfig.json (project-wide):
{
  "extends": "./.wxt/tsconfig.json",
  "compilerOptions": {
    "experimentalDecorators": true,
    "useDefineForClassFields": false
  },
  "angularCompilerOptions": {
    "strictInjectionParameters": true,
    "strictInputAccessModifiers": true,
    "strictTemplates": true
  }
}
tsconfig.app.json (Angular-specific):
{
  "compilerOptions": {
    "target": "ES2022",
    "module": "ES2022",
    "moduleResolution": "bundler",
    "lib": ["ES2022", "DOM"],
    "strict": true,
    "experimentalDecorators": true,
    "useDefineForClassFields": false,
    "skipLibCheck": true,
    "isolatedModules": true
  },
  "angularCompilerOptions": {
    "strictInjectionParameters": true,
    "strictInputAccessModifiers": true,
    "strictTemplates": true
  },
  "include": ["entrypoints/popup/**/*.ts"]
}
The include limits the files processed by the Angular compiler. If you want to use Angular in other entrypoints like options pages, add them here.
6. Create Angular Popup
Finally, create the entry point for the Angular application.
entrypoints/popup/index.html:
<!doctype html>
<html lang="en">
  <head>
    <meta charset="UTF-8" />
    <meta name="viewport" content="width=device-width, initial-scale=1.0" />
    <title>My Extension</title>
    <meta name="manifest.type" content="browser_action" />
  </head>
  <body>
    <app-root></app-root>
    <script type="module" src="./main.ts"></script>
  </body>
</html>entrypoints/popup/main.ts:
import './style.css';
import { bootstrapApplication } from '@angular/platform-browser';
import { provideZonelessChangeDetection } from '@angular/core';
import { App } from './app';

bootstrapApplication(App, {
  providers: [provideZonelessChangeDetection()],
}).catch((err: unknown) => console.error(err));entrypoints/popup/app.ts:
import { ChangeDetectionStrategy, Component } from '@angular/core';

@Component({
  selector: 'app-root',
  changeDetection: ChangeDetectionStrategy.OnPush,
  host: { class: 'block p-4' },
  template: `
    <h1 class="text-lg font-bold">Hello from Angular!</h1>
  `,
})
export class App {}entrypoints/popup/style.css:
@import 'tailwindcss';Since we’re now on Angular v21, I’m using provideZonelessChangeDetection() to enable change detection without Zone.js. In limited environments like browser extensions, Zone.js overhead is often wasteful, so this reduces bundle size and minimizes runtime overhead.
Development and Build
Once setup is complete, you can start the development server:
# Chrome dev server
pnpm dev

# Firefox dev server
pnpm dev:firefox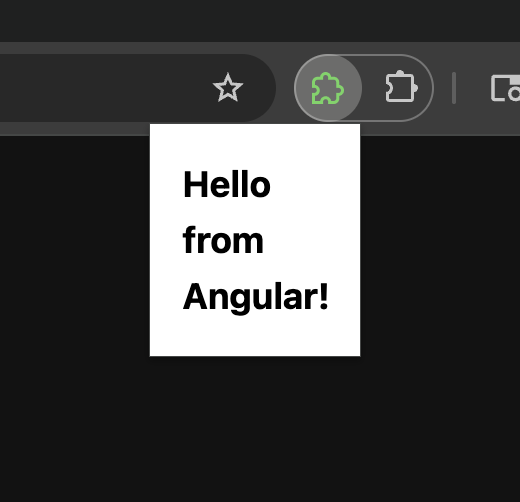
For production builds and packaging:
# Chrome build
pnpm build

# Firefox build and ZIP
pnpm zip:firefox
Summary
Combining WXT and Angular enables modern browser extension development. The appeal is being able to leverage both WXT’s excellent developer experience and Angular’s powerful features. Using this starter template, you can start development immediately without the setup hassle.
The repository mentioned at the beginning is published as a GitHub template repository, so if you’re interested, click Use this template on the repository to create your own browser extension.